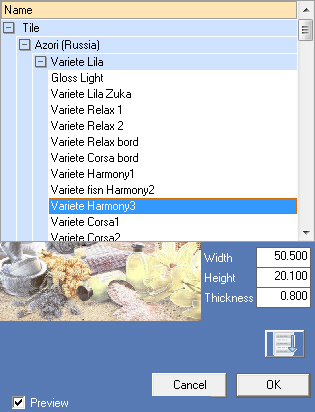
8.7. You can lay tile on the created surface using a Tile Catalogue (in the right window). To open the Tile Catalogue, click on “Materials” panel (above to the right) or right-click the Tile Catalogue and choose the option 'Add' from the pop-up menu (or double-click “Materials” panel). Thus the Tile Catalogue appears:
Button ![]() - sort the directory alphabetically. The mode is remembered and will be valid until the change.
- sort the directory alphabetically. The mode is remembered and will be valid until the change.
You can choose the desires tile or a tile collection (the upper level). Click OK, and the tile or the tile collection is loaded into the Tile Catalogue in the right window. If the desired tile is chosen, you can open the Catalogue Menu.
Right-click the tile and choose the option 'Properties'. Thus a dialog box appears, containing the 3D image of the tile and the tile measures:
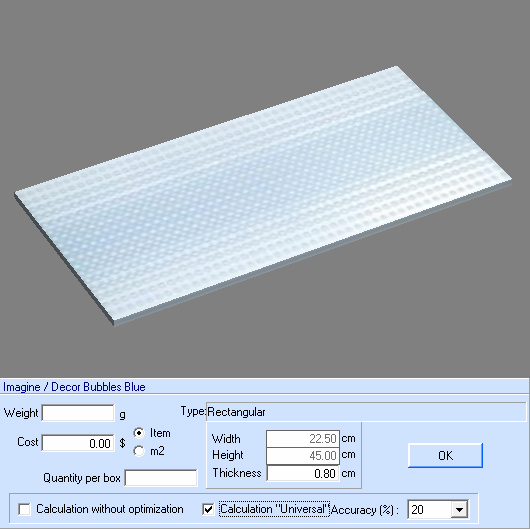
Here you can change some tile properties, such as weight, cost and quantity of tiles in a packing. All these properties are used to calculate the project. Note: tiles loaded from the Materials are considered as project tiles; so the changes are accepted only in the project but not in the original Materials.
You can change the parameter 'Thickness' of the coating – all already laid elements of the coating will change the thickness. Sometimes users ignore this parameter of the coating, so it is easy to correct it here. Note that the loaded coatings from the directory are considered to be the coatings of the project and the changes are applied only to the project but not to the original reference-book of materials.
Also here you can configure how this coverage will be calculated in the project. If you select the 'Calculation without optimization' option, then each given tile in the project (regardless of the surface area) will be considered whole. This is necessary when the properties of the tile (for example, a drawing) do not allow the use of residues. This setting is the same as in the 'Create Elevation'.
You can select the 'Universal' calculation for any tile and set the calculation accuracy. Description of this type of calculation in the 'System Settings'. For tile type "Mosaic" is better to choose the rounding accuracy lower, to exclude an overestimated calculation result. In this context, 'rounding accuracy' means greater calculation accuracy and the use of tile residues.
To clear the list of chosen tiles, in the Catalogue Menu choose the option 'Clear'. Thus tiles that are not used in the project are deleted from the list. In order to check the status of materials the проект itself and to correct possible problems, select the menu item "Optimize". In this case, all sortings of the coverage in the project itself will be rebuilt, and texture optimization will be carried out.
The menu has the option of rotate the coating. If the cover is already attached to the project, but you want to rotate – take advantage of this opportunity. A rotation is possible if the coating is on the surfaces of the project (or you need to remove it). This change also does not affect the original reference-book of materials.
In order to check database state and correct possible errors select 'Optimize' from the pop-up menu. This will resort tile list in the project and optimize texture files. When you add new tiles to the project, they will be added in the end of the list.
8.7.1. To lay the tile, double-click the desired tile to select it. Thus the current tile background is changed.

Then move the mouse pointer over the surface to be covered and click it. The tile is placed in the selected surface square. To cancel selection of the tile, double-click it again.
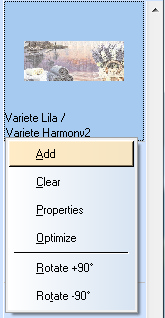
8.7.2. To speed up the tile laying you can use some automatic operations. To enter the automatic modes, right-click the selected tile piece (or the tile row) on the surface to be covered. Thus a pop-up menu opens with the list of automatic operations.
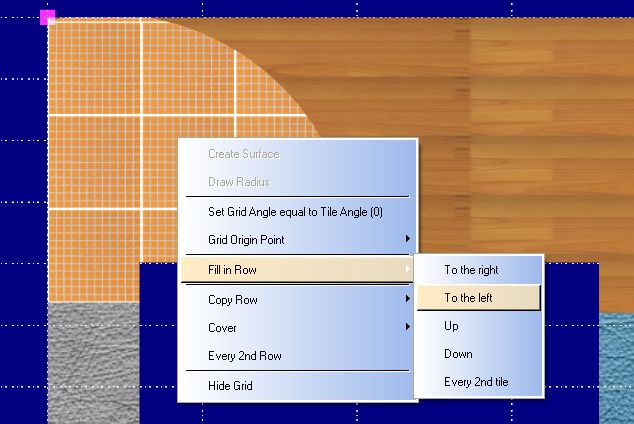
Option 'Fill in Row' - to fill the row with the selected tile (the tile that was selected when the menu was opened) in the desired direction. If the option 'Every 2nd tile' is selected, then only every second tile in the row is filled.
Option 'Copy Row' - to copy the selected row in the desired direction. If the option 'Every 2nd Row' is selected, then only every second row is filled.
Option 'Cover' - to copy the selected row in the desired direction up to the end of the surface to be covered. If the option 'Every 2nd Row' is selected, then only every second row is filled.
The options 'Every 2nd Row' and 'Every 2nd tile' are useful for creation of a checkerboard surface. To switch off these options, choose them in the menu again.