14. The system allows placing 3D objects (*.3dt and *.3ds) into the room to create a more realistic image. The file format *.3ds is well-known and doesn't need special explanations. However, it is necessary to notice that some 3ds objects can be displayed in the system incorrectly. It can happen because the displaying of duplicated and clone elements of 3ds objects is rather complicated. 3dt is an internal format of Tile3D software. It includes a 3dt object, a preview-image that is displayed in the catalogue, texture external files, an object settings for POV-Ray render and Tile3D. By default all objects are located in the "Models" subdirectory of the program’s main directory.
There are two ways to place an object.
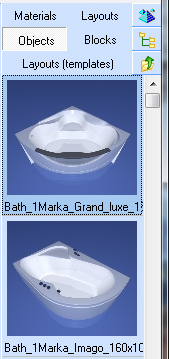
1) Click the button 'Objects' to open a list of folders in the subfolder 'Models'. Select the desired folder and double-click it to open. To leave the current object folder, click on ![]() button. After selecting an object you may right-click on the mouse and choose 'Properties' in the pop-up menu. A window with the object image and properties will appear. To place the desired object in your project, double-click it. Thus the current object background is changed. Then move the mouse pointer over the room and click where you want to place the object. Thus the object is placed in the desired place on the floor-level. To cancel the selection of the current object, double-click it again. The selection of the object is cancelled automatically by placing.
button. After selecting an object you may right-click on the mouse and choose 'Properties' in the pop-up menu. A window with the object image and properties will appear. To place the desired object in your project, double-click it. Thus the current object background is changed. Then move the mouse pointer over the room and click where you want to place the object. Thus the object is placed in the desired place on the floor-level. To cancel the selection of the current object, double-click it again. The selection of the object is cancelled automatically by placing.
The button ![]() is designed to quickly navigate to the desired subdirectory of the 'Models' directory. The tooltip of this button displays the currently selected subdirectory. When you click on the button, a window opens with a tree of subdirectories:
is designed to quickly navigate to the desired subdirectory of the 'Models' directory. The tooltip of this button displays the currently selected subdirectory. When you click on the button, a window opens with a tree of subdirectories:

Install the desired subdirectory and click 'OK'.
2) Using the second way, you can place not only 3dt objects, but also 3ds objects. To do it, click on ![]() button. A browser window appears.
button. A browser window appears.
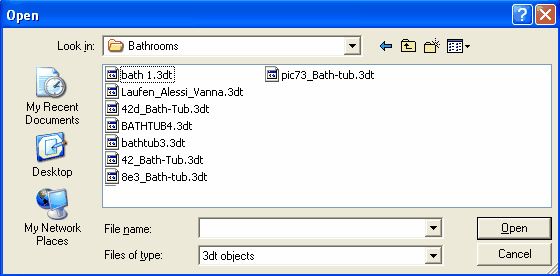
Browse to the desired the object and click the button 'Open'. After loading, the object is automatically marked with a semitransparent block.
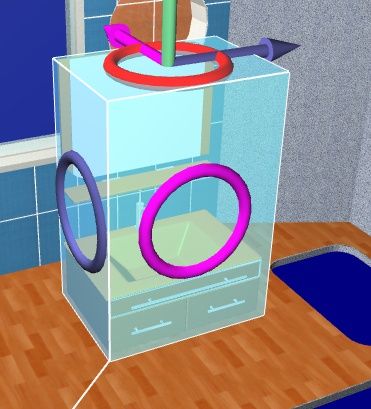
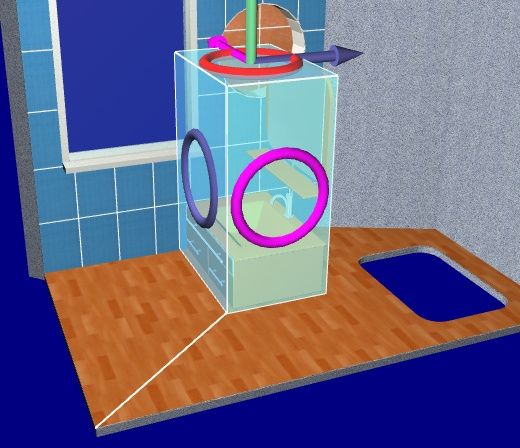
To move the placed object in three dimensions, use the color arrows. Put the mouse pointer over an arrow and click and hold the mouse button. Move the mouse pointer in the desired direction. Thus the object is moved. Tori are designed to rotate an object at any angle around the axis. Place the cursor on a torus and click the left mouse button. By holding the left mouse button move the mouse to the left or to the right in order to rotate the object. When you select an object, the panel with object’s angles and coordinates settings is automatically activated in the bottom part of the screen.
![]()
An angle entering/editing mode is activated by default (the ![]() button is switched on). When you rotate an object, rotation angles are displayed in the appropriate fields. If you enter rotation angle values in these fields, an object will be rotated. Using the
button is switched on). When you rotate an object, rotation angles are displayed in the appropriate fields. If you enter rotation angle values in these fields, an object will be rotated. Using the ![]() button you can return an object to its original position (all angles=0). By clicking the
button you can return an object to its original position (all angles=0). By clicking the ![]() button you turn off the display of X and Y tori. In this case, if you select an objects or a block, there won’t be any tori near them. This option could be useful when it isn’t necessary to rotate the object along X and Y axes and you don’t want to block up the object’s display. By clicking the
button you turn off the display of X and Y tori. In this case, if you select an objects or a block, there won’t be any tori near them. This option could be useful when it isn’t necessary to rotate the object along X and Y axes and you don’t want to block up the object’s display. By clicking the ![]() button again you turn on the display of additional tori. If you try to move the object, the object coordinates entering/editing mode will be activated automatically (the
button again you turn on the display of additional tori. If you try to move the object, the object coordinates entering/editing mode will be activated automatically (the ![]() button will be switched on).
button will be switched on).
![]()
In this case the object's coordinates are measured from the bottom left corner of the room to the closest bottom corner of the selected object.
The ![]() button is intended to put a reference point in any of the room’s corners.
button is intended to put a reference point in any of the room’s corners.
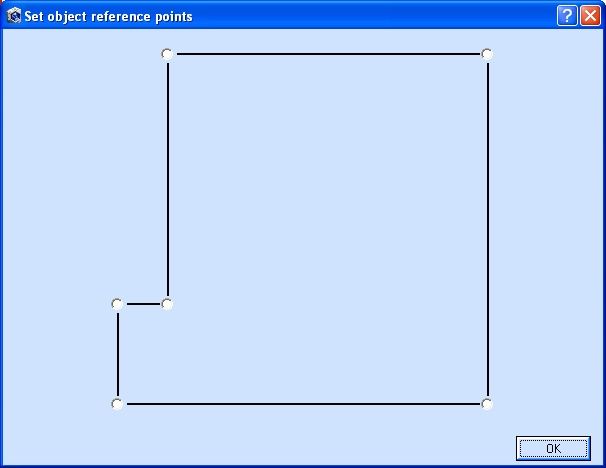
Select any angle and click OK to put a reference point in it.
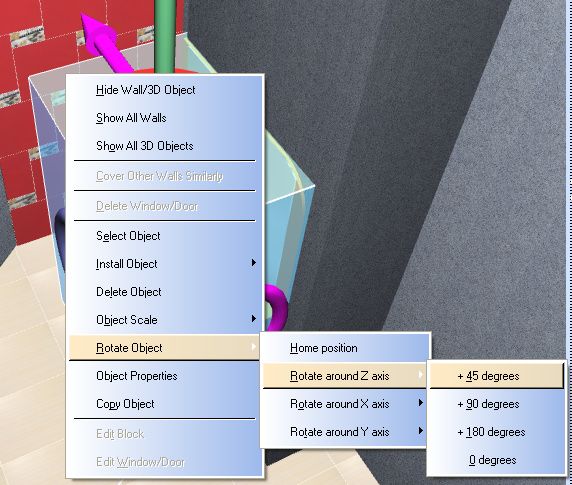
In order to deselect an object you should double click it with the left mouse button. If you want to select the object again, double click it again. If you add an object using the ![]() button, it will be places in the middle of a room at a floor level. By right clicking the object you open a context menu that allows you to manage the current object.
button, it will be places in the middle of a room at a floor level. By right clicking the object you open a context menu that allows you to manage the current object.
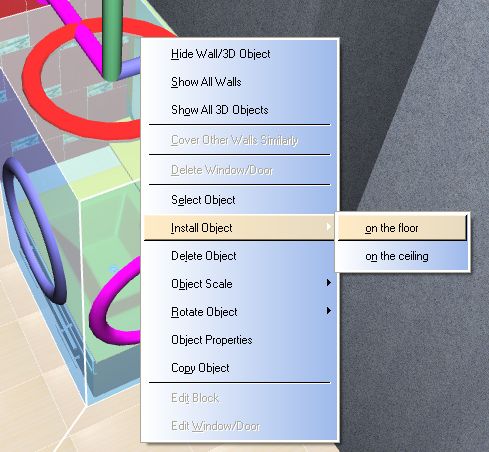
"Install Object" -> "on the floor", "on the ceiling " – is used to put the current object on the floor, ceiling.
"Delete Object" – allows you to delete the current object (or Del key).
"Object Scale" -> submenu that allows you to change object’s units of measurement, i.e. the scale. Scale positions are given from the lowest to the highest. When you scale an object it is placed in the center of the room at a floor level.

'Rotate Object' -> 'Axis' -> submenu that is used to rotate an object around the selected axis at a fixed angle ('0 degrees' option is used to return an object to its original position).
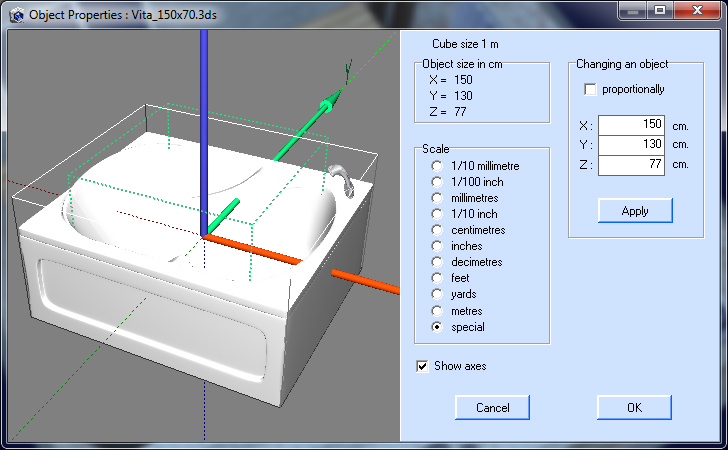
'Object properties' - in this case, the object is loaded into a separate window. See the picture below. Here you can estimate the size of the object by changing its scale, as well as see the positioning of the object relative to the coordinate axes. The scale of the object in this case is determined by setting the unit of measurement in which the object was created. You can also change the scale or size of the object (if the object is already installed in the project) by directly changing the dimensions for X, Y and Z. If you set 'proportional', then after leaving the size editing field, the remaining sizes will change automatically. When you set your own dimensions, the 'Scale' value will change to 'special'.
'Copy object' – allows you to copy the current object.
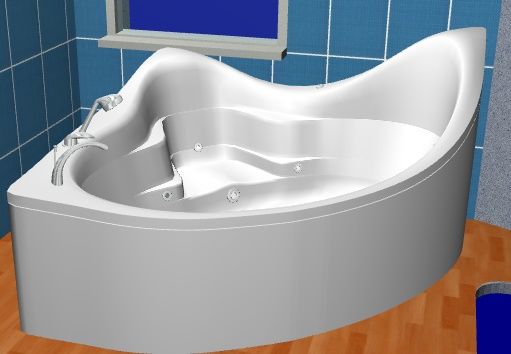
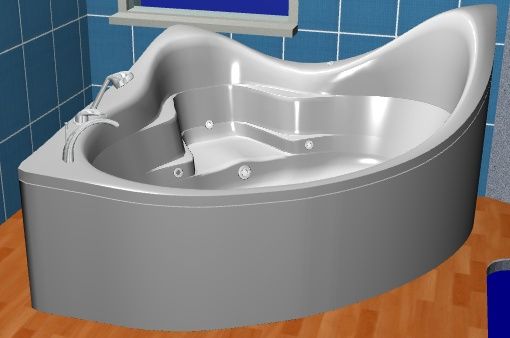
In order to increase an object quality you should use the ![]() button in the bottom left corner of the program’s window. This button turns on/off a gloss on the object’s surfaces that were adjusted using Make3DT - a special utility program that is included in Tile3D software. Most objects on tile3d.com website are already adjusted using Make3DT. That leads to increase in object’s image quality in Tile3D and in POV-Ray render. 'Gloss' mode doesn’t require large additional video resources, you can always enable or disable it. However, it is possible to enable this mode only if your graphic card capability allows you to do it. Note that the main requirement for the graphic card is the correct support of OpenGL video format (version 1.5 or higher) and not less than 512 MB of video memory. The images below show an object without gloss (the upper one) and an object with gloss (the bottom one).
button in the bottom left corner of the program’s window. This button turns on/off a gloss on the object’s surfaces that were adjusted using Make3DT - a special utility program that is included in Tile3D software. Most objects on tile3d.com website are already adjusted using Make3DT. That leads to increase in object’s image quality in Tile3D and in POV-Ray render. 'Gloss' mode doesn’t require large additional video resources, you can always enable or disable it. However, it is possible to enable this mode only if your graphic card capability allows you to do it. Note that the main requirement for the graphic card is the correct support of OpenGL video format (version 1.5 or higher) and not less than 512 MB of video memory. The images below show an object without gloss (the upper one) and an object with gloss (the bottom one).
The window for importing 3D objects from the site opens in the program by double-clicking the left mouse button on the "Objects" panel or through the "Objects" - > "Import 3DT objects" menu.